*책 내용과 다르게, 다음과 같은 환경에서 프로젝트 생성
- Windows11(윈도우 11) 환경
- 자바 JDK 17 버전 설치 https://yungenie.tistory.com/11
[Java] 차근차근 Java 설치하기 (JDK17, Window 11)
자바 개발 도구 설치 방법에 대해서 알아보겠습니다. Java17은 LTS(Long Term Support : 장기 지원) 릴리즈로 1년 후까지 기술 지원 및 버그를 개선한 서비스를 제공받을 수 있습니다. 업데이트 버전을 꾸
yungenie.tistory.com
- 스프링 부트 4.31.0 사용 - STS(Spring Tool Suite) 설치(Spring Tools for Eclipse - https://spring.io/tools)
=> https://priming.tistory.com/147 참고
[Windows] Spring Tool Suite 4(STS 4) 다운로드 및 설치
STS란?Spring Tool Suite(STS)는 스프링 프로젝트를 생성하고, 개발할 수 있게 해주는 도구입니다. STS 설치 과정에 대해 설명드리겠습니다. 설치 파일 다운로드STS 공식 사이트에서 설치 파일을 다운로
priming.tistory.com

- MySQL Community Server 8.0.42 설치 https://dev.mysql.com/downloads/mysql/
MySQL :: Download MySQL Community Server
Select Version: 9.3.0 Innovation 8.4.5 LTS 8.0.42 Select Operating System: Select Operating System… Microsoft Windows Ubuntu Linux Debian Linux SUSE Linux Enterprise Server Red Hat Enterprise Linux / Oracle Linux Fedora Linux - Generic Oracle Solaris mac
dev.mysql.com

- Gradle
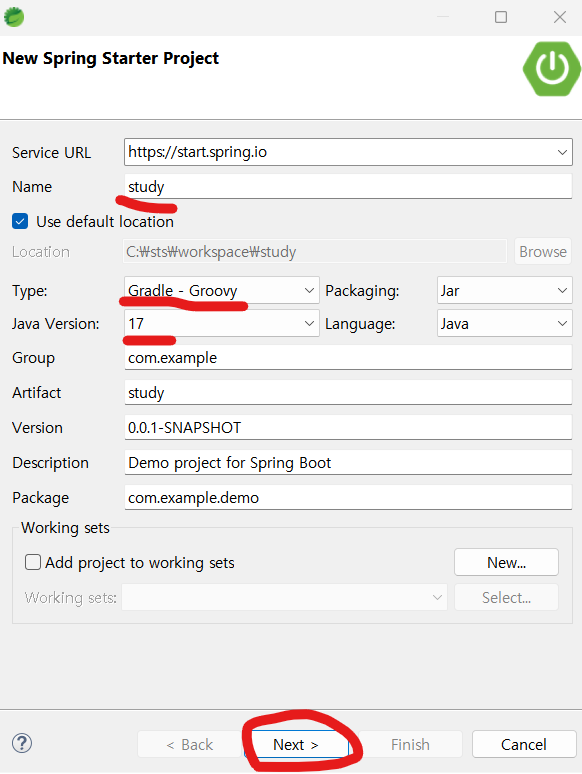
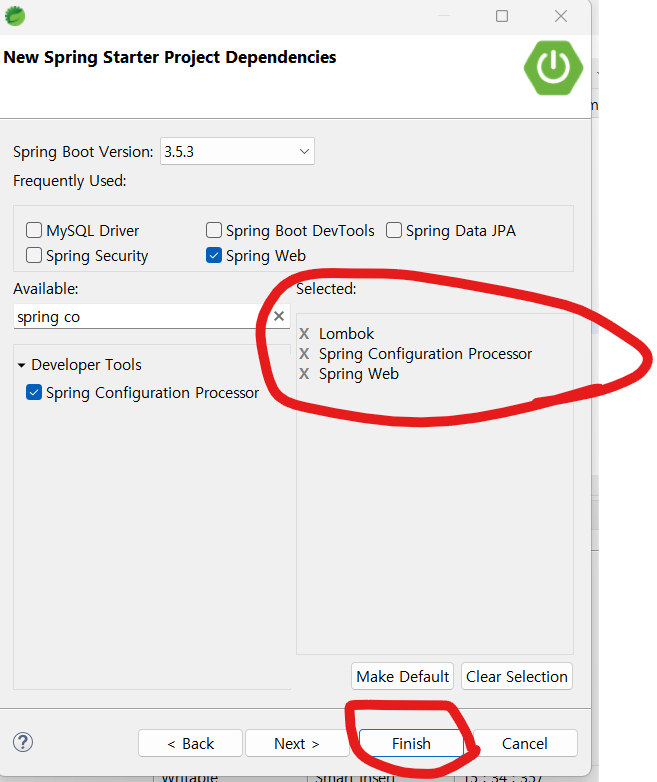
**STS에서 Gradle 프로젝트 생성한 과정

*** 함께 보면 좋은 글
스프링 부트 핵심 가이드(장정우 지음) - 개발에 앞서 알면 좋은 기초 지식
1. 서버 간 통신마이크로서비스 아키텍처에서 한 서버가 다른 서버에 통신을 요청하는 것을 의미-> 한 대는 서버/다른 한 대는 클라이언트가 됨 가장 많이 사용되는 방식은 HTTP/HTTPS 방식(TCP/IP, SOA
keep-programming-study.tistory.com
1. Gradle 기초
1) build.gradle
- Gradle 빌드 도구의 핵심 설정 파일
- Groovy 또는 Kotlin DSL로 작성된 빌드 스크립트(Build Script)
-> 빌드 스크립트: 소스 코드, 리소스, 의존성 등을 컴파일하고 패키징하는 과정을 자동화하는 스크립트
| plugins | 프로젝트에 필요한 기능을 활성화 |
| group, version | 프로젝트의 메타 정보 설정 |
| java | 자바 버전 설정 |
| repositories | 라이브러리 다운로드 위치 지정 |
| dependencies | 사용할 라이브러리 명시 |
(1) 플러그인 설정: Java, Spring Boot, 의존성 관리 등 필요한 기능을 활성화
plugins {
  // Java 프로젝트로서 컴파일, 테스트, JAR 생성 등의 기본 작업을 가능하게 해주는 플러그인
  id 'java'
  // Spring Boot 애플리케이션을 위한 플러그인 -> bootRun, bootJar 같은 태스크를 제공
  id 'org.springframework.boot' version '3.5.3'
  // Maven처럼 의존성 버전을 중앙에서 관리할 수 있게 해주는 플러그인 -> Spring Boot와 함께 자주 사용됨.
  id 'io.spring.dependency-management' version '1.1.7'
}
(2) 프로젝트 정보 설정: 그룹명, 버전, 자바 호환성 등
// 패키지 네이밍이나 배포 시 사용
group = 'com.example'
// 현재 프로젝트의 버전(0.0.1-SNAPSHOT은 개발 중인 버전)
version = '0.0.1-SNAPSHOT'

// Gradle에서 Java Toolchain 기능을 사용하여 Java 17 버전의 JDK를 명시적으로 지정하는 설정
// -> Java 11만 설치했더라도, Gradle이 Java 17을 자동으로 다운로드해서 빌드를 수행(CI/CD에서도 매우 유용)
java {
  toolchain {
    languageVersion = JavaLanguageVersion.of(17)
  }
}
(3) 저장소 설정: 라이브러리를 어디서 받을지 지정
// 라이브러리를 다운로드할 저장소를 지정. Maven 중앙 저장소에서 의존성을 가져옴
// -> 필요에 따라 jcenter(), google(), mavenLocal() 등도 추가 가능
repositories {
  mavenCentral()
}- 의존성 설정: 사용할 라이브러리 명시
dependencies {
  // 여기에 라이브러리들을 추가
  // implementation: 컴파일과 런타임에 필요한 의존성. 외부에 노출되지 않음.
  //api: 컴파일과 런타임에 필요하며, 다른 모듈에서도 접근 가능.
  // compileOnly: 컴파일 시에만 필요하고, 런타임에는 제외됨.
  // runtimeOnly: 런타임에만 필요하고, 컴파일에는 사용되지 않음.
  // testImplementation: 테스트 코드에서만 사용하는 의존성.
  implementation 'org.springframework.boot:spring-boot-starter-data-jpa'
  implementation 'org.springframework.boot:spring-boot-starter-security'
  implementation 'org.springframework.boot:spring-boot-starter-web'
  developmentOnly 'org.springframework.boot:spring-boot-devtools'
  runtimeOnly 'com.mysql:mysql-connector-j'
  testImplementation 'org.springframework.boot:spring-boot-starter-test'
  testImplementation 'org.springframework.security:spring-security-test'
  testRuntimeOnly 'org.junit.platform:junit-platform-launcher'
  compileOnly 'org.projectlombok:lombok'
  annotationProcessor 'org.projectlombok:lombok'
  testCompileOnly 'org.projectlombok:lombok'
  testAnnotationProcessor 'org.projectlombok:lombok'
}
2) Gradle 빌드 생명주기 (Build Lifecycle)
- Gradle은 3단계 생명주기를 통해 빌드를 수행
-> ./gradlew build 명령을 실행하면 생명주기를 따라 전체 빌드 수행
| 1단계: 초기화 | 어떤 프로젝트를 빌드할지 결정하고, settings.gradle을 통해 프로젝트 구조 설정 |
| 2단계: 구성 | 각 프로젝트의 build.gradle을 읽고, 작업(Task)들을 구성 |
| 3단계: 실행 | 명령어로 지정된 작업(Task)들을 실행 (예: build, test, clean 등) |
2. API를 작성하는 다양한 방법
1) GET API 만들기
- 웹 서버에서 값을 가져올 때 사용하는 API
(1) @GetMapping 활용(매개변수 없음)
// /api/hello로 GET 요청 시 "Hello, Spring Boot!" 문자열 반환
// 매개변수 없이 단순한 응답을 처리할 때 사용
@RestController
@RequestMapping("/api")
public class HelloController {

  @GetMapping("/hello")
  public String sayHello() {
    return "Hello, Spring Boot!";
  }
}
(2) @GetMapping & @PathVariable 활용
// /api/user/123 요청 시 "User ID: 123" 반환
// URL 경로에 포함된 값을 동적으로 추출할 때 사용
@RestController
@RequestMapping("/api")
public class PathVariableController {

  @GetMapping("/user/{id}")
  public String getUserById(@PathVariable("id") Long userId) {
    return "User ID: " + userId;
  }
}
(3) @GetMapping & @RequestParam 활용
// /api/search?keyword=spring&page=2 요청 시 "Searching for: spring, Page: 2" 반환
// -> 쿼리 파라미터를 통해 필터링, 검색, 페이징 등에 활용
@RestController
@RequestMapping("/api")
public class RequestParamController {

  @GetMapping("/search")
  public String search(@RequestParam String keyword, @RequestParam(defaultValue = "1") int page) {
    return "Searching for: " + keyword + ", Page: " + page;
  }
}
(4) DTO(각 클래스 및 인터페이스를 호출하며 전달하는 매개변수로 사용하는 데이터)객체 활용
// DTO 클래스 정의
public class UserRequestDto {
  private String name;
  private String email;
  private int age;

  // Getters and Setters
}
// 컨트롤러에서 DTO 사용
// /api/userinfo?name=John&email=john@example.com&age=30 요청 시 DTO 객체에 자동 매핑
// -> 파라미터가 많을 때 코드를 깔끔하게 유지
@RestController
@RequestMapping("/api")
public class DtoController {
@GetMapping("/userinfo")
public String getUserInfo(UserRequestDto userRequestDto) {
return "Name: " + userRequestDto.getName() +
", Email: " + userRequestDto.getEmail() +
", Age: " + userRequestDto.getAge();
}
}2) POST API 만들기
- 웹 애플리케이션을 통해 데이터베이스 등의 저장소에 리소스를 저장할 때 사용하는 API
- 저장하고자 하는 리소스나 갓을 HTTP 바디(body)에 담아 서버에 전달
-> URI가 GET API에 비해 간단
(1) @PostMapping & @RequestBody 활용
// 클라이언트가 "Student" 같은 문자열을 JSON으로 보내면, 서버는 이를 받아 "Hello, Student!"이라고 응답
// -> 단순한 문자열이나 기본 타입을 받을 때 사용
@RestController
@RequestMapping("/api")
public class SimplePostController {

  @PostMapping("/greet")
  public String greetUser(@RequestBody String name) {
    return "Hello, " + name + "!";
  }
}
(2) DTO객체 활용
// DTO 클래스 정의
public class UserRequestDto {
  private String name;
  private String email;
  private int age;

  // Getters and Setters
}
// 컨트롤러에서 DTO 사용
// 클라이언트가 JSON 형식으로 사용자 정보를 보내면, 서버는 DTO로 매핑하여 처리
// -> 복잡한 구조나 여러 필드를 받을 때 유용
@RestController
@RequestMapping("/api")
public class DtoPostController {
@PostMapping("/user")
public String createUser(@RequestBody UserDto userDto) {
return "User created: " + userDto.getName() + ", Email: " + userDto.getEmail() + ", Age: " + userDto.getAge();
}
}3) PUT API 만들기
- 웹 애플리케이션 서버를 통해, 데이터베이스 등 저장소에 존재하는 리소스 값을 업데이트
- 주로 전체 리소스를 갱신할 때 사용
(1) @PutMapping & @RequestBody 활용(단순 데이터 수신)
// DTO 클래스 정의
public class UserDto {
  private String name;
  private String email;
  private int age;

  // Getters and Setters
}
// 컨트롤러에서 DTO 사용
// -> 클라이언트가 JSON 형식으로 사용자 정보를 보내면, 서버는 DTO로 매핑하여 처리
@RestController
@RequestMapping("/api")
public class SimplePutController {
@PutMapping("/user")
public String updateUser(@RequestBody UserDto userDto) {
return "Updated user: " + userDto.getName() + ", Email: " + userDto.getEmail() + ", Age: " + userDto.getAge();
}
}(2) @PutMapping & ResponseEntity 활용(상태 코드+데이터 반환)
// ResponseEntity는 HTTP 상태 코드 + 응답 데이터를 함께 반환할 수 있어 유연하고 명확한 응답 처리에 유리
// -> 성공 시 200 OK, 실패 시 404 Not Found, 400 Bad Request 등을 반환
@RestController
@RequestMapping("/api")
public class ResponsePutController {

  @PutMapping("/user/{id}")
  public ResponseEntity<UserDto> updateUser(@PathVariable Long id, @RequestBody UserDto userDto) {
    // 실제로는 DB에서 id로 사용자 조회 후 수정
    userDto.setName(userDto.getName() + " (updated)");

    return ResponseEntity.ok(userDto);
  }
}
4) PATCH API 만들기
- 웹 애플리케이션 서버를 통해, 데이터베이스 등 저장소에 존재하는 리소스 값을 업데이트
-> 주로 일부 리소스를 갱신할 때만 사용
(1) @PatchMapping & @RequestBody
// DTO 클래스 정의
public class UserPatchDto {
  private String name;
  private Integer age;
  private String email;

  // Getters and Setters
}
// 클라이언트가 수정할 필드만 JSON으로 보내고, 서버는 해당 필드만 업데이트
@RestController
@RequestMapping("/api")
public class PatchController {
@PatchMapping("/user/{id}")
public String patchUser(@PathVariable Long id, @RequestBody UserPatchDto dto) {
// 예시: DB에서 기존 사용자 조회
// User user = userRepository.findById(id).orElseThrow();
// 부분 수정
if (dto.getName() != null) {
// user.setName(dto.getName());
}
if (dto.getAge() != null) {
// user.setAge(dto.getAge());
}
if (dto.getEmail() != null) {
// user.setEmail(dto.getEmail());
}
// userRepository.save(user);
return "User " + id + " partially updated.";
}
}(2) @PatchMapping & ResponseEntity
// ResponseEntity를 사용하면 성공/실패에 따라 HTTP 상태 코드와 메시지를 명확하게 전달
// -> 수정 결과에 따라 HTTP 상태 코드와 응답 데이터를 함께 반환
@RestController
@RequestMapping("/api")
public class PatchResponseController {

  @PatchMapping("/user/{id}")
  public ResponseEntity<String> patchUserWithResponse(@PathVariable Long id, @RequestBody UserPatchDto dto) {
    // 수정 로직은 위와 동일
    boolean updated = false;

    if (dto.getName() != null || dto.getAge() != null || dto.getEmail() != null) {
        updated = true;
        // 실제 수정 코드 추가
    }

    if (updated) {
      return ResponseEntity.ok("User updated successfully.");
    } else {
      return ResponseEntity.badRequest().body("No fields to update.");
    }
  }
}
5) DELETE API 만들기
(1) @DeleteMapping & @PathVariable 활용
// @PathVariable은 URL 경로에 포함된 값을 추출
// -> DELETE /users/123 → id = 123
import org.springframework.web.bind.annotation.DeleteMapping;
import org.springframework.web.bind.annotation.PathVariable;
import org.springframework.web.bind.annotation.RestController;

@RestController
public class UserController {

  // DELETE 요청: /users/123
  @DeleteMapping("/users/{id}")
  public String deleteUserById(@PathVariable Long id) {
    // 실제 삭제 로직은 생략 (예: DB에서 삭제)
    return "User with ID " + id + " deleted successfully.";
  }
}
(2) @DeleteMapping & @RequestParam 활용
// RequestParam은 쿼리 스트링에서 값 추출
// -> DELETE /users?name=학생 → name = 학생
import org.springframework.web.bind.annotation.DeleteMapping;
import org.springframework.web.bind.annotation.RequestParam;
import org.springframework.web.bind.annotation.RestController;

@RestController
public class UserController {

  // DELETE 요청: /users?name=John
  @DeleteMapping("/users")
  public String deleteUserByName(@RequestParam String name) {
    // 실제 삭제 로직은 생략 (예: DB에서 삭제)
    return "User with name '" + name + "' deleted successfully.";
  }
}
*HTTP CRUD(Create, Read, Update, Delete) 메서드별 멱등성 정리
- 멱등성: 어떤 대상에 같은 연산을 여러번 실행해도 변하지 않는 성질
| HTTP 메서드 | 멱등성 여부 | 설명 |
| GET | O | 서버의 리소스 조회 -> 여러 번 요청해도 결과가 같으며 서버 상태에 영향을 주지 않음 |
| POST | X | 서버에 리소스를 생성하거나 처리 -> 여러 번 요청하면 중복 생성될 수 있음. |
| PUT | O | 리소스를 전체 수정 -> 같은 요청을 여러 번 보내도 결과는 동일함. |
| PATCH | △ | 리소스를 부분 수정 -> 요청마다 결과가 달라질 수 있음 |
| DELETE | O | 리소스를 삭제 -> 여러 번 요청해도 첫 요청 이후는 동일한 결과(이미 삭제됨) |
| HEAD | O | GET 요청과 유사하지만 본문 없이 헤더만 반환 클라이언트가 리소스의 메타 정보(예: Content-Length, Last-Modified)만 확인하고 싶을 때 사용 -> 서버 상태에 영향 없음 |
| OPTIONS | O | 서버가 해당 리소스에 대해 지원하는 HTTP 메서드 목록 반환 CORS(교차 출처 요청)에서 Preflight 요청으로 자주 사용 -> 상태 변화 없음 |