*22년 4월 한 달간 한국이러닝협회의 '실전 개발자를 위한 Spring Framework'를 수강하고 정리한 내용입니다
*모든 이미지의 출처는 한국이러닝협회의 '실전 개발자를 위한 Spring Framework'에 있습니다
1. MyBatis 소개
1) MyBatis의 개요
- 자바 오브젝트와 SQL문 사이의 자동 Mapping 기능을 지원하는 Object Mapper
- SQL을 별도의 파일로 분리해서 관리하게 함
- 객체-SQL 사이의 파라미터 Mapping 작업 자동 진행
-> 많은 인기를 얻고 있음
- ORM(Object Relation Mapper) 아님
- Hibernate나 JPA(Java Persistence Api)처럼 새로운 DB 프로그래밍 패러다임을 익혀야 하는 부담이 없음
->개발자가 익숙한 SQL을 그대로 이용
- JDBC 코드 작성의 불편함 제거
- 도메인 객체나 VO 객체를 중심으로 개발 가능
2) MyBatis의 특징
(1) 쉬운 접근성과 코드의 간결함
- 가장 간단한 퍼시턴스 프레임워크
- JDBC의 모든 기능을 제공 (XML 형태로 서술된 JDBC 코드라고 생각해도 될 정도)
- 복잡한 JDBC 코드를 걷어내면서, 깔끔한 소스코드 유지 가능
- 수동적인 파라미터 설정과 쿼리 결과에 대한 맵핑 구문 제거 가능
(2) SQL문과 프로그래밍 코드의 분리
- SQL에 변경이 있을 때 자바 코드를 수정하거나 compile 하지 않아도 됨
- SQL 작성과 관리 또는 검토를 DBA와 같은 개발자가 아닌 다른 사람에게 맡길 수도 있음
(3) 다양한 프로그래밍 언어로 구현 가능
- Java, C#, .NET, Ruby
3) MyBatis3과 MyBatis-Spring의 주요 컴포넌트
(1) MyBatis와 MyBatis-Spring을 사용한 DB(데이터베이스) 엑세스 Architecture

(2) MyBatis3의 주요 컴포넌트
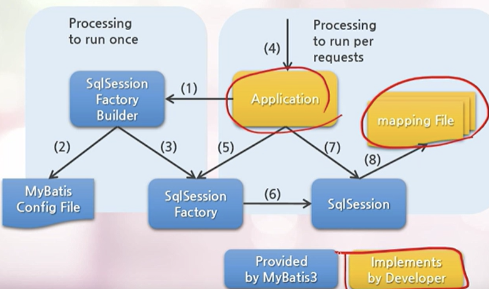
| MyBatis3의 주요 컴포넌트의 역할 | |
| MyBatis 설정파일 (SqlMapConfig.xml) | 데이터베이스의 접속 주소 정보나 Mapping 파일 경로 등의 고정된 환경정보 설정 |
| SqlSessionFactoryBuilder | MyBatis 설정 파일을 바탕으로 SqlSessionFactory를 생성 |
| SqlSessionFactory | SqlSession을 생성 |
| SqlSession | 1. 핵심적인 역할을 하는 클래스 - SQL/트랜잭션 관리를 실행 2. SqlSession 오브젝트는 Thread-Safe 하지 않으므로, thread마다 필요에 따라 생성 |
| mapping 파일 (user, xml) | SQL문과 OR Mapping을 설정 |
(3) MyBatis-Spring의 주요 컴포넌트

| MyBatis-Spring의 주요 컴포넌트의 역할 | |
| MyBatis 설정파일 (SqlMapConfig.xml) | VO 객체의 정보를 설정 |
| SqlSessionFactoryBean | 1. MyBatis 설정파일을 바탕으로 SqlSessionFactory를 생성 2. Spring Bean으로 등록해야 함 |
| SqlSessionTemplate | 1. 핵심적인 역할을 하는 클래스 - SQL/트랜잭션 관리를 실행 2. SqlSession 인터페이스를 구현하며, Thread-Safe 함 3. Spring Bean으로 등록해야 함 |
| Mapping 파일 (user,xml) | SQL문과 OR Mapping을 설정 |
| Spring Bean 설정파일 (beans.xml) | 1. SqlSessionFactoryBean을 Bean 등록할 때, DataSource 정보와 MyBatis Config 파일 정보와 Mapping 파일 정보를 함께 설정함 2. SqlSessionTemplate을 Bean으로 등록 |
2. Mapper XML 파일
1) Mapper XML 파일의 개요
- 위의 1. MyBatis의 가장 큰 장점
- SQL문을 저장하는 존재를 Mapping 파일이라고 함
- JDBC 코드에 비해 코드 수가 95% 이상 감소
- SQL 작성에 집중할 수 있도록 만들어짐
<!DOCTYPE mapper
		PUBLIC "-//mybatis.org//DTD Mapper 3.0//EN"
        "http://mybatis.org/dtd/mybatis-3-mapper.dtd">
<mapper namespace="org.apache.ibatis.submitted.rounding.Mapper">

<resultMap type="org.apache.ibatis.submitted.rounding.User" id="usermap">
	<id column="id" property="name"/>
    <result column="name" property="name/>
    <result column="funkyNumber" property="funkyNumber"/>
    <result column="roundingMode" property="roundingMode"/>
</resultMap>

<select id="getUser" resultMap="usermap">
	select*from users
</select>

<insert id="insert">
	insert into users (id, name, funkyNumber, roundingMode values (
    	#{id}, #{name}, #{funkyNumber}, #{roundingMode})
<insert>
</mapper>
2) Mapper XML 설정
- DAO 클래스가 작성되면 이를 작성하는 SQL문 작성이 필요
- 작성 순서
(1) XML로 작성된 Mapper의 위치(저장경로) 결정
(2) Mapper XML 파일을 작성하고 필요한 DTD 추가 (템플릿 파일 사용)
(3) SQL 작성
<!DOCTYPE mapper
		PUBLIC "-//mybatis.org//DTD Mapper 3.0//EN"
        "http://mybatis.org/dtd/mybatis-3-mapper.dtd">
<mapper namespace="">
</mapper>
3) Mapper XML 파일 작성 예시
(1) Select
- Mybatis에서 가장 많이 사용하는 엘레먼트
- 어플리케이션은 데이터 수정보다 데이터 조회를 주로 함
-> Mybatis에서는 데이터를 조회하는 기능에 집중함
<select id="selectPerson" parameterType="int" resultType="hashmap">
	SELECT * FROM PERSON WHERE ID = #{id}
</select>
- 위 쿼리의 이름은 selectPerson, 파라미터는 int이고 결과 데이터는 HashMap에 저장됨
//JDBC 코드와 유사함. (Mybatis 코드는 아님)
String selectPerson = "SELECT * FROM PERSON WHERE ID=?";
PreparedStatement ps = conn.prepareStatement(selectPerson);
ps.selInt(1,id);
* select 엘레먼트 세부 속성: Mybatis에서 가장 많이 사용되며, 이걸로 반환되는 결과가 Result Maps
<select
	id="selectPerson"
    parameterType="int"
    parameterMaps"deprecated"
    resultType="hashmap"
    resultMap="personResultMap"
    flushCache="false"
    useCache="true"
    timeout="10000"
    fetchSize="256"
    statementType="PREPARED"
    resultSetType="FORWARD_ONLY">
* Result Maps
- MyBatis에서 가장 중요하고 강력한 요소
- 데이터베이스에서 데이터를 가져올 때 작성되는 JDBC 코드를 대부분 줄여주는 역할
<select id="selectUsers" resultMap="UserMap">
	select user_id, user_name, user_password
    from users
    where id = #{id}
</select>
- 위 쿼리는 다음의 resultMap에 저장됨
<resultMap id="userResultMap" type="User">
	<id property="id" column="user_id" />
    <result property="username" column="user_name" />
    <result property="hashedPassword" column="user_password" />
</resultMap>
- 위 resultMap은 type에 기반하는데, 다음의 클래스를 참조함
package com.someapp.model;

public class User {

    private int id;
    private String username;
    private String hashedPassword;

    public int getId() {
    	return id;
    }

    public void setId(int id) {
    	this.id = id;
    }

    public String getUsername() {
    	return username;
   	}

    public void setUsername(String username) {
    	this.username = username;
    }

    public String getHashedPassword() {
    	return hashedPassword;
    }

    public void setHashedPassword(String hashedPassword) {
    	this.hashedPassword = hashedPassword;
    }
}
(2) insert, update and delete - 데이터를 변경하는 구문은 상대적으로 간단함
<insert
	id="insertAuthor"
    parameterType="domain.blog.Author"
    flushCache="true"
    statementType="PREPARED"
    keyProperty=""
    keyColumn=""
    useGeneratedKeys=""
    timeout="20">

<update
	id="insertAuthor"
    parameterType="domain.blog.Author"
    flushCache="true"
    statementType="PREPARED"
    timeout="20">

<delete
	id="insertAuthor"
    parameterType="domain.blog.Author"
    flushCache="true"
    statementType="PREPARED"
    timeout="20">
* insert, update and delete 예제
<insert id="insertAuthor">
	insert into Author (id, username, password, email, bio)
    values (#{id}, #{username}, #{password}, #{email}, #{bio})
</insert>

<update id="updateAuthor">
	update Author
    set username = #{username}
    	, password = #{password}
        , email = #{email}
        , bio = #{bio}
    where id = #{id}
</update>

<delete id="deleteAuthor">
	delete from Author
    where id = #{id}
</delete>
- MS-SQL, MySQL의 경우 KeyProperty 설정(id column이 생략됨-key 자동 생성)
<insert id="insertAuthor" useGeneratedKeys="true" keyProperty="id">
	insert into Author (username, password, email, bio)
    values (#{username}, #{password}, #{email}, #{bio})
</insert>
4) SQL 작성
(1) sql 태그 <sql>
- 다른 구문에서 재사용 가능한 SQL 구문을 정의함
<sql id="userColumns"> id,username,password </sql>
- 다른 구문에서 사용
<select id="selectUsers" resultType="map">
	select <include refid="userColumns" />
    from some_table where id = #{id}
</select>
(2) Parameters
- 쿼리의 파라미터
- PreparedStatement의 경우, 전달되는 객체에 따라 파라미터의 타입이 결정됨
<select id="selectUsers" resultType="User">
	select id, username, password
    from users
    where id = #{id}
</select>
- Mybatis의 경우 "User" 타입의 파라미터가 전달되었고, 각 멤버변수가 파라미터의 이름이 됨
<insert id="insertUser" parameterType="User">
	insert into users (id, username, password)
    values (#{id}, #{username}, #{password})
</insert>
5) MyBatis 로깅 :: log4jdbc-log4j2
(1) MyBatis의 로그를 보다 자세히 확인 가능하게 해줌
- Log4jdbc-log4j2 라이브러리 의존성 추가
(2) 데이터소스 변경
<bean id="dataSource"
			class="org.springframework.jdbc.datasource.SimpleDriverDataSource">
	<property name="driverClass"
    			value="net.sf.log4jdbc.sql.jdbcapi.DriverSpy" />
    <property name="url" value="jdbc:log4jdbc:mysql://127.0.0.1:3306/spring" />
    <property name="username" value="spring" />
    <property name="password" value="spring />
</bean>
- JDBC 드라이버 클래스 net.sf.log4jdbc.DriverSpy로 변경
- 연결 URL 중간에 'log4jdbc'라는 단어 추가
- log4jdbc.log4j2.properties 파일 추가
'스프링(Spring), 스프링부트(SpringBoot) > 스프링(Spring) 기초' 카테고리의 다른 글
| PointCut 표현식과 Advisor 구현 (0) | 2022.11.20 |
|---|---|
| Dynamic SQL (MyBatis 동적 SQL), AOP(Aspect Oriented Programming) (0) | 2022.11.02 |
| Spring-Data Access, DataSource, Servlet Context, Context 분리와 전략 (0) | 2022.10.19 |
| static file 처리와 FileUpload, JUnit & Spring-Test (0) | 2022.10.12 |
| @Controller, HTTP 파라미터 처리, RESTful API (2) | 2022.10.05 |