*** 함께 보면 좋은 글
스프링 부트 핵심 가이드(장정우 지음) - 개발에 앞서 알면 좋은 기초 지식
1. 서버 간 통신마이크로서비스 아키텍처에서 한 서버가 다른 서버에 통신을 요청하는 것을 의미-> 한 대는 서버/다른 한 대는 클라이언트가 됨 가장 많이 사용되는 방식은 HTTP/HTTPS 방식(TCP/IP, SOA
keep-programming-study.tistory.com
스프링 부트 핵심 가이드(장정우 지음) - REST API 명세를 문서화하는 방법(Swagger), 로깅 라이브러리
*책 내용과 다르게, 다음과 같은 환경에서 프로젝트 생성 Windows11(윈도우 11) 환경자바 JDK 17 버전 설치 https://yungenie.tistory.com/11 [Java] 차근차근 Java 설치하기 (JDK17, Window 11)자바 개발 도구 설치 방법
keep-programming-study.tistory.com
JAVA/JSP 16. 데이터베이스 - 커넥션 풀로 성능 개선, 간단한 쿼리 작성 및 실행
6. 커넥션 풀로 성능 개선웹은 클라이언트의 요청에 서버가 응답하는 구조→ Connection 객체 생성 때마다 네트워크 통신이 이뤄지며, 시간이 걸리는 작업들이 수반됨 == 시스템 성능에 큰 영향을
keep-programming-study.tistory.com
0. 서버 간 통신 개요
- 최근에 개발되는 서비스들은 MSA(마이크로서비스 아키텍처)를 주로 채택
: 애플리케이션이 가지고 있는 기능(서비스)이 하나의 비즈니스 범위만 가지는 형태로,
각 애플리케이션은 자신이 가진 기능을 API로 외부에 노출하고 다른 서버가 호출해서 사용할 수 있도록 구성되므로,
각 서버가 다른 서버의 클라이언트가 되는 경우도 많음 - 서버 간 통신은 이러한 트렌드에 맞춰 다른 서버로 웹 요청을 보내고 응답을 받을 수 있게 도와주는,
RestTemplate과 WebClient로 가능
1. RestTemplate 개요
- 스프링에서 HTTP 통신 기능을 손쉽게 사용할 수 있도록 설계한 템플릿으로, HTTP 서버와의 통신을 단순화함
- RestTemplate 사용 시 RESTful 원칙을 따르는 서비스를 편리하게 만들 수 있음
- 기본적으로 동기 방식으로 처리되는데, 비동기 방식을 원한다면 AsyncRestTemplate 사용
- 현업에서 많이 쓰이지만, 지원 중단(deprecated)된 상태이므로 WebClient 방식도 함께 알아두는 것을 권장
1) RestTemplate 특징
- HTTP 프로토콜의 메서드에 맞는 여러 메서드 제공
- RESTful 형식을 갖춘 템플릿
- HTTP 요청 후 JSON, XML, 문자열 등 다양한 형식의 응답을 받을 수 있음
- 블로킹(blocking) I/O 기반의 동기 방식 사용
: 프로그램이 I/O(입출력) 작업을 요청하면 그 자리에서 멈추고 결과가 올 때까지 기다린 뒤 다음 작업을 진행
(요청 → 대기 → 결과 → 다음 실행 흐름) - 다른 API 호출 시 HTTP 헤더에 다양한 값 설정 가능
2) RestTemplate 동작 구조

- 그림에서 애플리케이션은 우리가 직접 작성하는 애플리케이션 코드 구현부를 의미하며,
RestTemplate을 선언하고 URI와 HTTP 메서드, Body 등을 설정하는 역할을 함 - 외부 API로 요청을 보내게 되면 RestTemplate에서 HttpMessageConverter를 통해 RequestEntity를 요청 메시지로 변환
- RestTemplate에서는 변환된 요청 메시지를 ClientHttpRequestFactory를 통해,
ClientHttpRequest로 가져온 후 외부 API로 요청을 보냄 - 외부에서 요청에 대한 응답을 받으면 RestTemplate는 ResponseErrorHandler로 오류를 확인한 후,
오류가 있다면 ClientHttpResponse에서 응답 데이터를 처리 - 받은 응답 데이터가 정상적이라면 다시 한 번 HttpMessageConverter를 거쳐 자바 객체로 변환한 다음,
애플리케이션으로 반환
3) RestTemplate의 대표적인 메서드 정리
| 메서드 | HTTP 형태 | 설명 |
| getForObject | GET | GET 형식으로 요청한 결과를 객체로 반환 |
| getForEntity | GET | GET 형식으로 요청한 결과를 ResponseEntity로 반환 |
| postForLocation | POST | POST 형식으로 요청한 결과를 헤더에 저장된 URI로 반환 |
| postForObject | POST | POST 형식으로 요청한 결과를 객체로 반환 |
| postForEntity | POST | POST 형식으로 요청한 결과를 ResponseEntity로 반환 |
| delete | DELETE | DELETE 형식으로 요청 |
| put | PUT | PUT 형식으로 요청 |
| patchForObject | PATCH | PATCH 형식으로 요청한 결과를 객체로 반환 |
| optionsForAllow | OPTIONS | 해당 URI에서 지원하는 HTTP 메서드를 조회 |
| exchange | 모두 | HTTP 헤더를 임의로 추가할 수 있으며, 모든 메서드 형식에서 사용 가능 |
| execute | 모두 | 요청과 응답에 대한 콜백을 수정할 수 있으며, 모든 메서드 형식에서 사용 가능 |
2. RestTemplate 사용하기
- 요청을 보낼 서버 용도로 별도 프로젝트를 하나 생성한 다음, 다른 프로젝트에서 RestTemplate을 통해 요청을 보내는 방식
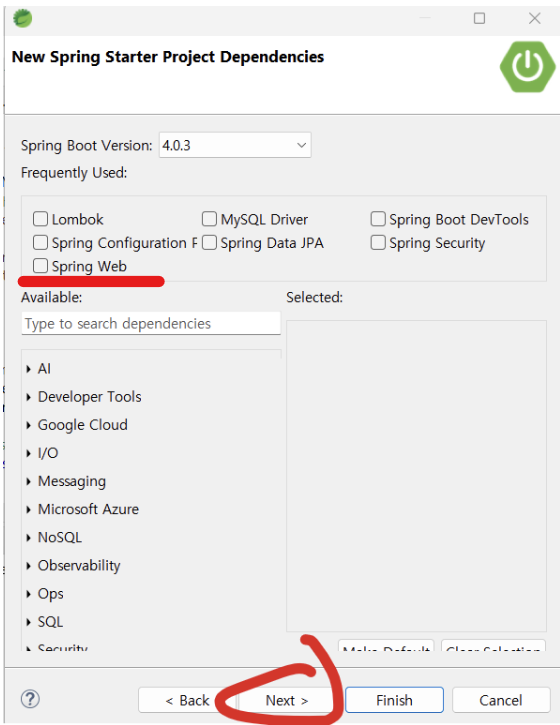
1) 서버 프로젝트 생성: spring-boot-starter-web만 의존성에 추가
- File -> new -> Spring Starter Project 클릭


2) 서버 프로젝트 설정 변경
(1) application.properties에서 server.port 속성 추가
server.port=9090(2) MemberDto.java 생성
package com.example.demo.dto;

public class MemberDto {
	private String name;
	private String email;
	private String organization;
	public String getName() {
		return name;
	}
	public void setName(String name) {
		this.name = name;
	}
	public String getEmail() {
		return email;
	}
	public void setEmail(String email) {
		this.email = email;
	}
	public String getOrganization() {
		return organization;
	}
	public void setOrganization(String organization) {
		this.organization = organization;
	}

	@Override
	public String toString() {
		return "MemberDto [name=" + name + ", email=" + email + ", organization=" + organization + "]";
	}
}
(3) CrudController.java 생성
package com.example.demo.controller;
import org.springframework.http.HttpStatus;
import org.springframework.http.ResponseEntity;
import org.springframework.web.bind.annotation.GetMapping;
import org.springframework.web.bind.annotation.PathVariable;
import org.springframework.web.bind.annotation.PostMapping;
import org.springframework.web.bind.annotation.RequestBody;
import org.springframework.web.bind.annotation.RequestHeader;
import org.springframework.web.bind.annotation.RequestMapping;
import org.springframework.web.bind.annotation.RequestParam;
import org.springframework.web.bind.annotation.RestController;
import com.example.demo.dto.MemberDto;
@RestController // REST API 컨트롤러임을 명시
@RequestMapping("/api/v1/crud-api") // 기본 URL 경로 설정
public class CrudController {
@GetMapping
public String getName() {
// GET /api/v1/crud-api
// 단순히 문자열 "Flature"를 반환
return "Flature";
}
@GetMapping(value="/{variable}")
public String getVariable(@PathVariable String variable) {
// GET /api/v1/crud-api/{variable}
// URL 경로에 포함된 값을 그대로 반환
return variable;
}
@GetMapping("/param")
public String getNameWithParam(@RequestParam String name) {
// GET /api/v1/crud-api/param?name=값
// 쿼리 파라미터로 전달된 name을 사용해 인사 메시지 반환
return "Hello. "+ name + "!";
}
@PostMapping
public ResponseEntity<MemberDto> getMember(
@RequestBody MemberDto dto, // 요청 Body(JSON)로 전달된 MemberDto 객체
@RequestParam String name, // 쿼리 파라미터 name
@RequestParam String email, // 쿼리 파라미터 email
@RequestParam String organization // 쿼리 파라미터 organization
) {
// POST /api/v1/crud-api?name=...&email=...&organization=...
// Body와 파라미터를 함께 받아 처리
System.out.println(dto.getName());
System.out.println(dto.getEmail());
System.out.println(dto.getOrganization());
// 새로운 MemberDto 객체 생성 후 파라미터 값으로 세팅
MemberDto mdto = new MemberDto();
mdto.setName(name);
mdto.setEmail(email);
mdto.setOrganization(organization);
// HTTP 200 OK 응답과 함께 MemberDto 반환
return ResponseEntity.status(HttpStatus.OK).body(mdto);
}
@PostMapping(value="/add-header")
public ResponseEntity<MemberDto> addHeader(
@RequestHeader("my-header") String header, // 요청 헤더에서 "my-header" 값 추출
@RequestBody MemberDto mdto // 요청 Body(JSON)로 전달된 MemberDto 객체
) {
// POST /api/v1/crud-api/add-header
// 헤더 값과 Body를 함께 받아 처리
System.out.println(header);
// HTTP 200 OK 응답과 함께 Body로 받은 MemberDto 반환
return ResponseEntity.status(HttpStatus.OK).body(mdto);
}
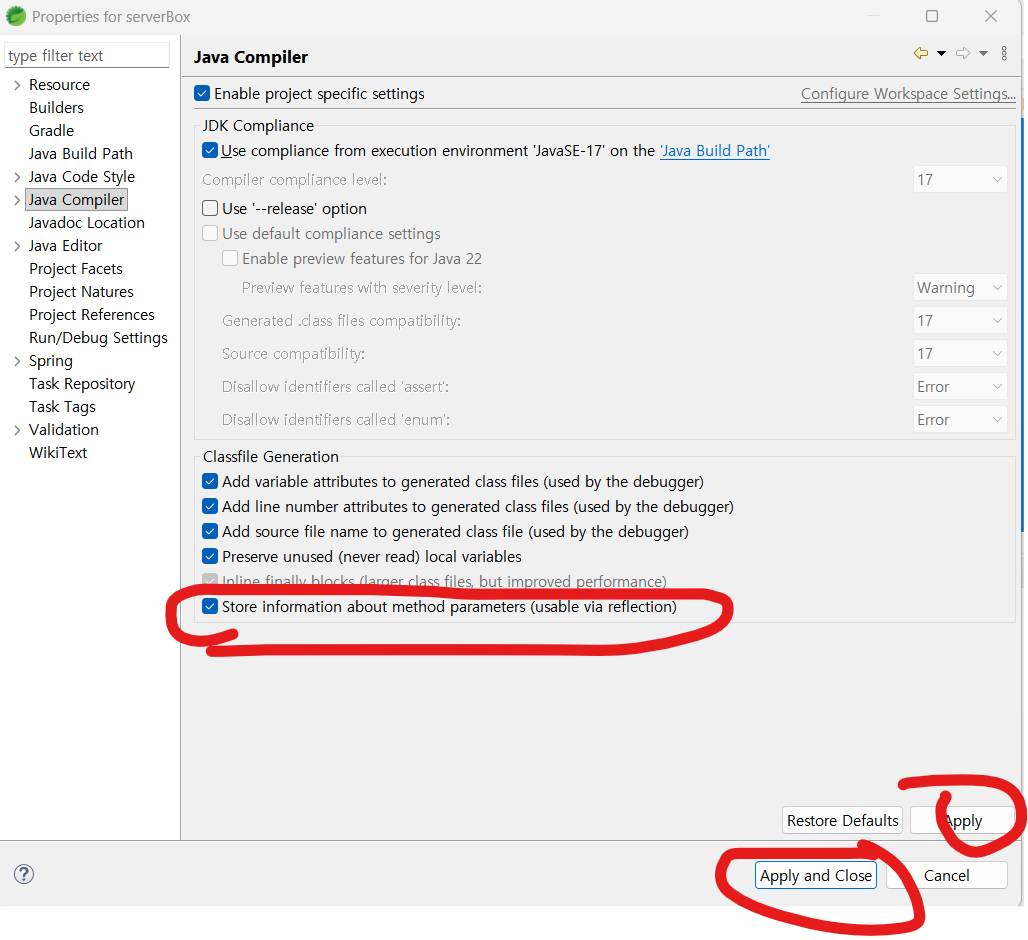
}(4) 프로젝트 우클릭 -> Properties -> Java Compiler -> Store information about method parameters (-parameters) 체크
- @RequestBody가 안 먹히는 문제 방지
3) RestTemplate 구현하기: 서버+클라이언트 역할 모두 수행하는 프로젝트 생성
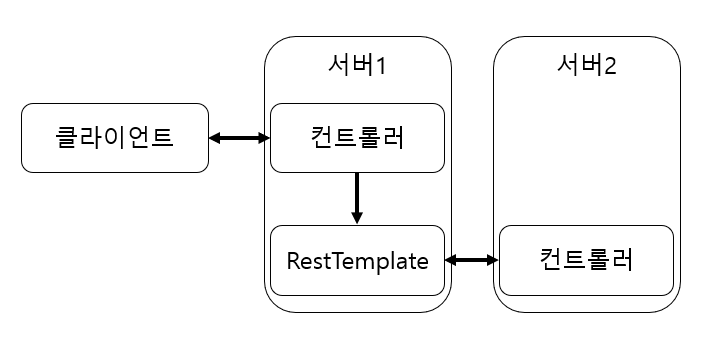
- 아래 이미지에서 클라이언트는 서버를 대상으로 요청을 보내고 응답을 받는 역할을 하고,
앞서 2)에서 만든 프로젝트는 '서버2'의 역할을 함 - 즉, RestTemplate를 포함하는 새 프로젝트를 생성
(1) 1)과 같은 방식으로 resttemplate라는 이름의 프로젝트 생성
(2) GET 형식의 RestTemplate 작성하기: RestTemlpateService.java 생성
package com.example.demo.service;

import java.net.URI;

import org.springframework.http.ResponseEntity;
import org.springframework.stereotype.Service;
import org.springframework.web.client.RestTemplate;
import org.springframework.web.util.UriComponentsBuilder;

@Service // 서비스 레이어 컴포넌트로 등록
public class RestTemlpateService {

    /**
     * 단순 GET 요청을 보내는 메서드
     * - 요청 대상: http://localhost:9090/api/v1/crud-api
     * - CrudController의 getName() 메서드 호출
     * - 응답 Body("Flature")를 반환
     */
    public String getName() {
        URI uri = UriComponentsBuilder
                .fromUriString("http://localhost:9090")
                .path("/api/v1/crud-api")
                .encode()
                .build()
                .toUri();

        RestTemplate restTemplate = new RestTemplate();
        ResponseEntity<String> responseEntity = restTemplate.getForEntity(uri, String.class);

        return responseEntity.getBody();
    }

    /**
     * PathVariable을 포함한 GET 요청을 보내는 메서드
     * - 요청 대상: http://localhost:9090/api/v1/crud-api/{name}
     * - expand("Flature")로 {name} 자리에 값 대입
     * - CrudController의 getVariable() 메서드 호출
     * - 응답 Body("Flature")를 반환
     */
    public String getNameWithPathVariable() {
        URI uri = UriComponentsBuilder
                .fromUriString("http://localhost:9090")
                .path("/api/v1/crud-api/{name}")
                .encode()
                .build()
                .expand("Flature")    // {name} 자리에 "Flature" 삽입
                .toUri();

        RestTemplate restTemplate = new RestTemplate();
        ResponseEntity<String> responseEntity = restTemplate.getForEntity(uri, String.class);

        return responseEntity.getBody();
    }

    /**
     * Query Parameter를 포함한 GET 요청을 보내는 메서드
     * - 요청 대상: http://localhost:9090/api/v1/crud-api/param?name=Flature
     * - CrudController의 getNameWithParam() 메서드 호출
     * - 응답 Body("Hello. Flature!")를 반환
     */
    public String getNameWithParameter() {
        URI uri = UriComponentsBuilder
                .fromUriString("http://localhost:9090")
                .path("/api/v1/crud-api/param")
                .queryParam("name", "Flature")
                .encode()
                .build()
                .toUri();

        RestTemplate restTemplate = new RestTemplate();
        ResponseEntity<String> responseEntity = restTemplate.getForEntity(uri, String.class);

        return responseEntity.getBody();
    }
}
(3) POST 형식의 RestTemplate 작성하기: RestTemlpateService.java에 추가
- MemberDto는 서버 프로젝트의 MemberDto 복사
- RestTemplateService.java에 추가한 코드
    /**
     * 서버의 POST 엔드포인트를 호출하면서
     * RequestBody(MemberDto)와 Query Parameter(name, email, organization)를 함께 전달하는 예시
     *
     * 요청 대상: http://localhost:9090/api/v1/crud-api?name=Flature&email=flature@book.com&organization=book
     * 요청 Body: MemberDto(JSON)
     * 응답: 서버에서 반환한 MemberDto 객체
     */
    public ResponseEntity<MemberDto> postWithParamAndBody() {
        URI uri = UriComponentsBuilder
                .fromUriString("http://localhost:9090")
                .path("/api/v1/crud-api")
                .queryParam("name", "Flature")
                .queryParam("email", "flature@book.com")
                .queryParam("organization", "book")
                .encode()
                .build()
                .toUri();

        // 요청 Body로 보낼 MemberDto 객체 생성
        MemberDto dto = new MemberDto();
        dto.setName("flature!!");
        dto.setEmail("flature@gmail.com");
        dto.setOrganization("gmail");

        // RestTemplate을 이용해 POST 요청 전송
        RestTemplate restTemplate = new RestTemplate();
        ResponseEntity<MemberDto> responseEntity = restTemplate.postForEntity(uri, dto, MemberDto.class);

        // 서버 응답 반환
        return responseEntity;
    }

    /**
     * 서버의 POST 엔드포인트를 호출하면서
     * RequestBody(MemberDto)와 Custom Header("my-header")를 함께 전달하는 예시
     *
     * 요청 대상: http://localhost:9090/api/v1/crud-api
     * 요청 Body: MemberDto(JSON)
     * 요청 Header: my-header=flature API
     * 응답: 서버에서 반환한 MemberDto 객체
     */
    public ResponseEntity<MemberDto> postWithHeader() {
        URI uri = UriComponentsBuilder
                .fromUriString("http://localhost:9090")
                .path("api/v1/crud-api")
                .encode()
                .build()
                .toUri();

        // 요청 Body로 보낼 MemberDto 객체 생성
        MemberDto dto = new MemberDto();
        dto.setName("flature");
        dto.setEmail("flature@naver.com");
        dto.setOrganization("naver");

        // RequestEntity를 이용해 Header와 Body를 함께 설정
        RequestEntity<MemberDto> requestEntity = RequestEntity
                .post(uri)
                .header("my-header", "flature API")
                .body(dto);

        // RestTemplate.exchange()로 요청 전송
        RestTemplate restTemplate = new RestTemplate();
        ResponseEntity<MemberDto> responseEntity = restTemplate.exchange(requestEntity, MemberDto.class);

        // 서버 응답 반환
        return responseEntity;
    }
(4) Swagger 설정: build.gradle에 의존성 추가 및 저장 후 우클릭->Gradle->Refresh Gradle Project 선택, SwaggerConfiguration.java 추가
// build.gradle
dependencies {
  // Swagger UI 및 OpenAPI 3 지원
  implementation 'org.springdoc:springdoc-openapi-starter-webmvc-ui:2.5.0'
}
package com.example.demo.config;
import org.springframework.context.annotation.Bean;
import org.springframework.context.annotation.Configuration;
import io.swagger.v3.oas.models.OpenAPI;
import io.swagger.v3.oas.models.info.Info;
/**
* Swagger(OpenAPI) 설정 클래스
*
* Springdoc-openapi 라이브러리를 사용하여 Swagger UI를 구성
* 이 Bean이 등록되면 /swagger-ui/index.html 경로에서 API 문서를 확인
*/
@Configuration
public class SwaggerConfiguration {
/**
* OpenAPI Bean 정의
* - title: API 문서의 제목
* - version: API 버전
* - description: API 설명
*
* 필요에 따라 Info 객체에 license, contact 등을 추가
*/
@Bean
public OpenAPI api() {
return new OpenAPI()
.info(new Info()
.title("Demo API")
.version("1.0")
.description("com.example.demo"));
}
}(5) RestTemplateController.java 추가
package com.example.demo.controller;
import org.springframework.http.ResponseEntity;
import org.springframework.web.bind.annotation.GetMapping;
import org.springframework.web.bind.annotation.PostMapping;
import org.springframework.web.bind.annotation.RequestMapping;
import org.springframework.web.bind.annotation.RestController;
import com.example.demo.dto.MemberDto;
import com.example.demo.service.RestTemlpateService;
/**
* RestTemplateController
*
* REST API 호출을 테스트하기 위한 컨트롤러 클래스
* - @RestController: REST API 응답(JSON 등)을 반환하는 컨트롤러임을 명시
* - @RequestMapping("/rest-template"): 모든 메서드의 기본 URL prefix를 "/rest-template"로 설정
*
* 이 컨트롤러는 RestTemlpateService를 주입받아 실제 외부 API 호출 로직을 실행
*/
@RestController
@RequestMapping("/rest-template")
public class RestTemplateController {
// Service 레이어 의존성 주입 (생성자 방식)
private final RestTemlpateService restTemlpateService;
public RestTemplateController(RestTemlpateService restTemlpateService) {
this.restTemlpateService = restTemlpateService;
}
/**
* 단순 GET 요청 예제
* - /rest-template
* - Service에서 이름을 가져와 반환
*/
@GetMapping
public String setName() {
return restTemlpateService.getName();
}
/**
* PathVariable을 사용하는 GET 요청 예제
* - /rest-template/path-variable
*/
@GetMapping("/path-variable")
public String getNameWithPathVariable() {
return restTemlpateService.getNameWithPathVariable();
}
/**
* Request Parameter를 사용하는 GET 요청 예제
* - /rest-template/parameter
*/
@GetMapping("/parameter")
public String getNameWithParameter() {
return restTemlpateService.getNameWithParameter();
}
/**
* POST 요청 예제 (Body + Parameter)
* - /rest-template
* - MemberDto 객체를 응답으로 반환
*/
@PostMapping
public ResponseEntity<MemberDto> postDto() {
return restTemlpateService.postWithParamAndBody();
}
/**
* POST 요청 예제 (Header 포함)
* - /rest-template/header
* - MemberDto 객체를 응답으로 반환
*/
@PostMapping("/header")
public ResponseEntity<MemberDto> postWithHeader() {
return restTemlpateService.postWithHeader();
}
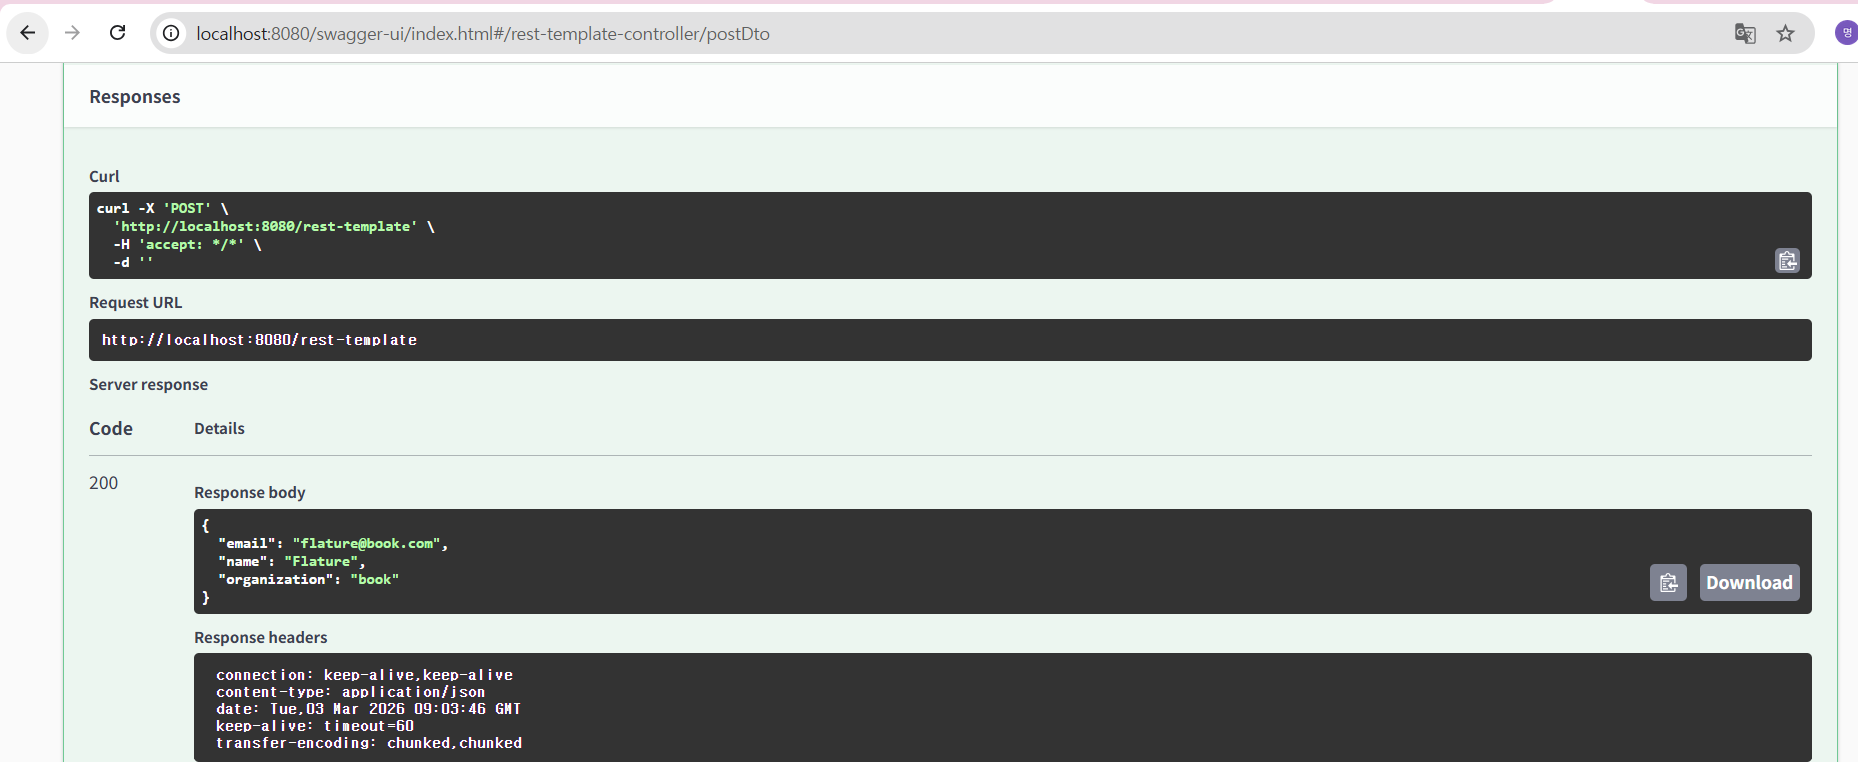
}(6) 서버(resttemplate 프로젝트) 실행 후, swagger 페이지(http://localhost:8080/swagger-ui/index.html)에서 postDto() 메서드 호출한 결과
4) RestTemplate 커스텀 설정 방법: HttpClient
- RestTemplate는 HTTPClient를 추상화하고 있기에 HTTPClient의 종류에 따라 기능에 다소 차이가 있음
-> 가장 큰 차이가 커넥션 풀(Connection Pool): RestTemplate 에서는 커넥션 풀을 지원하지 않음 - 커넥션 풀을 지원하지 않으면 매번 호출할 때마다 포트를 열어 커넥션 생성 필요
-> TIME_WAIT 상태가 된 소켓을 다시 사용하려 접근하면 재사용 불가한 문제를 방지하기 위해,
커넥션 풀 기능을 활성화하여 재사용할 수 있도록 아파치에서 제공하는 HttpClient로 대체하여 사용
(1) resttemplate 프로젝트에 HttpClient 의존성 추가
dependencies {
    // HttpClient 의존성 추가
    implementation 'org.apache.httpcomponents.client5:httpclient5:5.3.1'
}
(2) RestTemplateService.java 코드 수정
package com.example.demo.service;

import java.net.URI;

import org.apache.hc.client5.http.impl.classic.CloseableHttpClient;
import org.apache.hc.client5.http.impl.classic.HttpClients;
import org.apache.hc.client5.http.impl.io.PoolingHttpClientConnectionManager;
import org.springframework.http.RequestEntity;
import org.springframework.http.ResponseEntity;
import org.springframework.http.client.HttpComponentsClientHttpRequestFactory;
import org.springframework.stereotype.Service;
import org.springframework.web.client.RestTemplate;
import org.springframework.web.util.UriComponentsBuilder;

import com.example.demo.dto.MemberDto;

@Service // 서비스 레이어 컴포넌트로 등록
public class RestTemlpateService {
    ... 생략 ...
    /**
     * RestTemplate Bean 생성
     *
     * - HttpClient 5.x 기반 커넥션 풀 사용
     *   PoolingHttpClientConnectionManager로 최대 연결 수와 라우트별 연결 수 설정
     * - HttpComponentsClientHttpRequestFactory로 HttpClient 적용
     *   setConnectionRequestTimeout: 커넥션 풀에서 커넥션 가져올 때 대기 시간(ms)
     *   setReadTimeout: 서버 응답 대기 시간(ms)
     *
     * 외부 API 호출 시 커넥션 풀과 타임아웃 설정이 적용된 RestTemplate 반환
     */
    public RestTemplate restTemplate() {
    	PoolingHttpClientConnectionManager connManager = new PoolingHttpClientConnectionManager();
    	connManager.setMaxTotal(500);
    	connManager.setDefaultMaxPerRoute(500);

    	CloseableHttpClient httpClient = HttpClients.custom()
    			// HttpClient 5.x에서는 connection pool 설정이 다름
    			// setMaxConnTotal() 대신 ConnectionManager를 직접 설정해야 함
    			.build();

        HttpComponentsClientHttpRequestFactory factory = new HttpComponentsClientHttpRequestFactory(httpClient);
        factory.setConnectionRequestTimeout(2000);
        factory.setReadTimeout(5000);

        return new RestTemplate(factory);
    }

}
'스프링(Spring), 스프링부트(SpringBoot) > 스프링부트(SpringBoot) 기초' 카테고리의 다른 글
| 스프링부트 핵심 가이드(장정우 지음) - 스프링 시큐리티(Spring Security) 개요 (0) | 2026.03.26 |
|---|---|
| 스프링부트 핵심 가이드(장정우 지음) - 서버 간 통신 2: WebClient (0) | 2026.03.18 |
| 스프링부트 핵심 가이드(장정우 지음) - 액추에이터 주요 기능 살펴보기, 액추에이터 커스텀 기능 만들기 (0) | 2026.02.19 |
| 스프링부트 핵심 가이드(장정우 지음) - 예외 처리 에러 해결, 액추에이터 활용하기 (0) | 2026.02.04 |
| 스프링부트 핵심 가이드(장정우 지음) - 예외 처리 (0) | 2025.11.26 |